Disclaimer: The author would like to make it clear that he is not a Photoshop Guru. He is just a novice who juggles less than 5% of this excellent tool to create maps for this web site. All readers are hereby advised that this tutorial is by no means professional advice on map making or Photoshop.
Conventions: All menu options are denoted using the > symbol. For instance, Choosing the "File" menu followed by "New" would be denoted as File > New. Similarly all key presses are denoted by +. For instance, pressing Control, shift and N keys together would be Cntrl + Shift + N. The [?] symbol will be displayed with most instructions. Clicking on it will take you back to the section which briefly describes the action or tool.
Terrain Features (Continued)
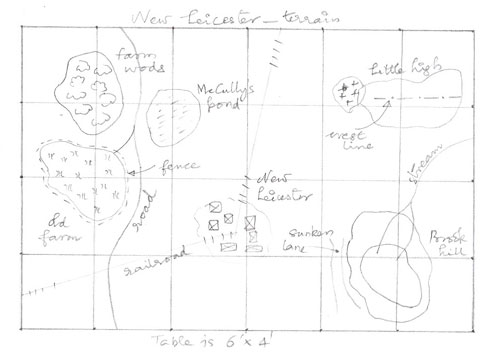
This article starts from where Part 1 of this tutorial left off. You can read Part 2 below or proceed to Part 3.
The look of the hills can be improved by adding its shadow to the picture. To achieve this follow Layer > Layer Style > Drop Shadow. Set the blend mode to multiply, angle to 120, opacity to 75%, tick global light, distance as 3, spread as 2 and size as 3. Hit OK. The hill should now "stand up" a bit on the map.
Note: A quick word on the options. Global light will ensure that all the shadows are aligned in the same way - as if they were cast by the same light source. Size and distance will determine how big the shadow is and how far the shadow falls. Opacity is a measure of how less you can see through the shadow. As always, feel free to experiment.
The same effect is applicable to other hills also. However forests look better without shadows. We will use the shadow effect again when marking troops.
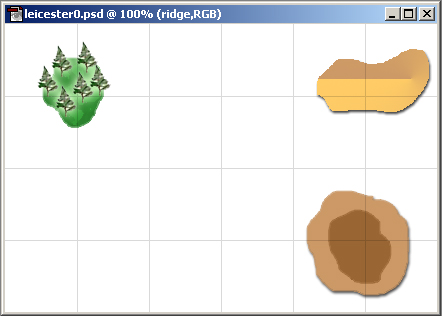
Farms and Other Cultivated Land
We treat farms as the same kind of feature irrespective of the season in most of our games. This need not always be true. For instance in Vietnam games, the nature of farms vary from season to season. Accordingly choose light shades of green or shades of brown [?] for your farms.
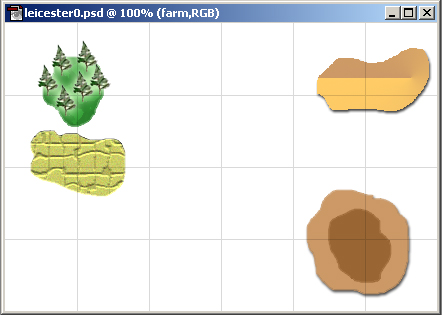
Create a new layer, name it as "farm" and use paintbrush [?] to draw the outline of the farm. Fill the farm with the foreground colour. I chose a mild yellow (#CCCC66) to indicate a ready to harvest crop. Now add some paths and plots to the farm. Filter > Texture > Mosaic Tiles is the way to go. Let Tile Size, Grout Width and Lighten Grout be 14, 1 and 10 respectively. Click OK. Do you have a farm with "paths" running across?
Add a "grainy" look and the farm is ready. Select Filter > Noise > Add Noise and set Amount and Distribution to 6 and Uniform respectively. We will make final adjustments to the farm when we create the ground layer but that can wait for now.
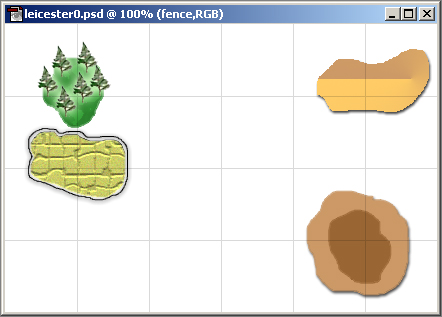
Our farm seems to have a fence running around it. Create a new layer named "fence" and select paint brush tool [?] . The colour could be black, or maybe green for hedges. Draw a thin line around the farm or as much of it as you want to see fenced. Drop a shadow here too Layer > Layer Style > Drop Shadow. Set the blend mode to multiply, angle to 120, opacity to 100%, tick global light, distance as 2, spread as 2 and size as 5. Now merge the fence layer down with the farm layer [?] .
Sunken Lanes

Sunken lanes are not as common as woods or hills. Yet they are important for the wargamer and therefore for the map makers. Our sketch has one sunken lane marked to the west of the hill. Create a new layer and name it as sunken lane. Choose a shade of mud brown and black as foreground and background colours [?] . Using a thin paint brush tool set to background colour - black - draw two lines which mark the edges of the lane. It would be a good idea to make the lines diverge slightly at the ends.
Select Airbrush Tool [?] and set its mode and pressure to dissolve and 60% respectively. Choose a Brush which can fit in between the edge lines which you drew earlier. Now drag the airbrush to get a spray painted muddy line which fits inside the edges. The simple sunken lane is ready.
Roads, Railroads etc.
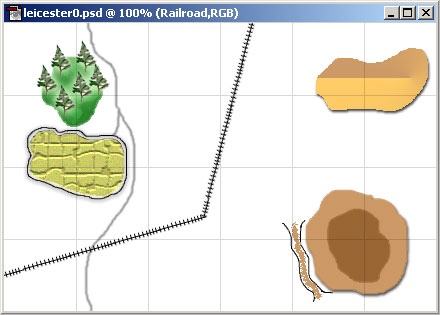
Roads come in several forms. Paved roads, muddy roads, dirt tracks and railroads are some of the more common types. The key decision is whether the road is straight (Roman Roads and sections of railroads) or not. The colour varies from black for paved and rail roads, mud brown for tracks and green for the rare grass covered paths. Ours is a curving road with some sort of paving. Create a new layer named "road", choose black and select the paintbrush tool [?] .
Set the Brush size to "Hard Round Three Pixels". Draw the road. There is a small fork leading to the farm, don't miss it. Once you are done, adjust the opacity [?] of the layer to 40%. The road is ready.
We also have a rail road leading into the town (refer sketch) and out. We'll create a small section of the railroad first and copy and paste this to lay out a continuous railroad. Create a "railroad" layer. Choose the line tool [?] . Set its weight to 1 pixel. Now:
- Draw a small line segment.
- Add another layer, say cross lines.
- Select the cross lines layer and draw another smaller line perpendicular to the one drawn just earlier. We need a -+-+-+-+-+-+-+- look for the railroad.
- Copy all (Cntrl + A) in the cross lines layer and paste (Cntrl + V). You get one more layer, one more cross line.
- Use the move tool [?] to place the cross lines to your liking.
- Repeat 4 and 5 until you have enough cross lines to fill the line segment mentioned in step 1.
- Once you are done, progressively merge down [?] all the cross line layers down with the railroad layer. We now have a piece of railroad.
- Rotate this piece as needed [?] .
- Copy all in the railroad layer and paste. You get another length of rail. Move it, rotate if necessary and position it suitably with the first segment. Merge down to railroad.
- Repeat step 9 until you have enough rails for you map.
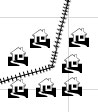
Built Up Areas
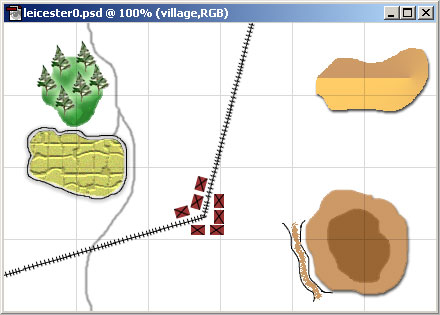
Built up areas consist mostly of various buildings. We therefore need to make a building icon first. There are three ways to go about this. First, we could create our own house icon.
- Use marquee tool [?] to select a small rectangle.
- Fill the selection [?] with a suitable colour, say brick brown.
- Change the colour to black and select the line tool [?] . Draw black diagonals over the rectangle.
- Select the marquee tool again and click outside the rectangle to deselect. The house icon is ready.
- Move the house around [?] , rotate [?] it as necessary. Copy and paste to get as many houses as you want. Merge down [?] to a "village" layer.
Second, we could use one of the pictorial fonts - Webdings - to lend us a house icon. The caveat is that your machine may not have this font installed. I am assuming that the font is present.
- Set the colour [?] and select the text tool [?] .
- Set font to Webdings and font size somewhere between 14-20 points.
- Click the tool on the map. A new "T" marked layer is created.
- Press H (upper case, mind you).
- A house icon should appear.
- Click on the marquee tool to deselect the text tool.
- Right click on the "T" layer in the layers panel. Choose Rasterize Layer. This will convert the text layer to an image layer.
- Copy and paste as many houses as you need. Merge down to form village.
Note: You can choose to create your villages any way you like. But make sure that they all look aesthetically uniform - do not mix and match the custom, webdings and third party icons.
Third, we could borrow from other people's clip art. The procedure is similar. Copy and paste clip art into a new layer. Repeat as many times as needed. Finally merge down to get a village or town as the case may be.
Water Features
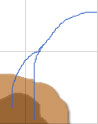
Let us start with the easiest: the humble stream. Choose a suitable colour say a shade of blue. Select paintbrush tool [?] and set the brush suitably - say "Hard Round One Pixel". Create a new layer named "stream" and draw the stream on it. That is all. Our stream originates on the hill and flows roughly north east.
Rivers are similar except that they are normally wider. The Brush size would change to "Hard Round Three Pixels". The colour could be a darker shade of blue, or brown if a dry river.
A pond, lake or sea would be slightly more tricky. We need two colours, both shades of blue. The foreground colour (e.g. #206EBB) should be darker than the background colour (e.g. #99CCFF). Create the "pond" layer, draw the outline using paintbrush and fill with the foreground colour. Now comes the finishing touch. Follow Filter > Distort > Ocean Ripple. Set ripple size and ripple magnitude to 2 and 14 respectively. Click Ok. Pond is ready.
For oceans you can to use a colour close to white or white itself as the background while creating Ocean Ripples. You can use the airbrush [?] with white colour to create the beaches if called for.
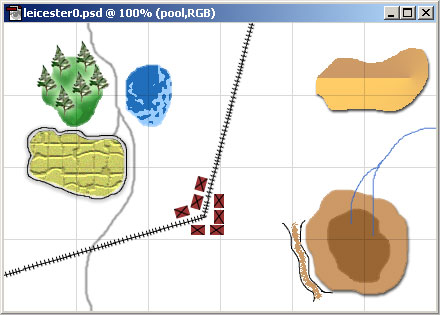
Rough Going
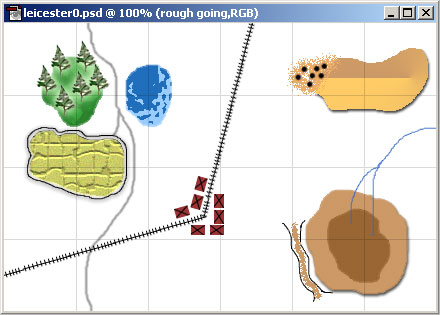
There is no generic way to mark rough going on a map. Our sketch simply says "rough going". I am assuming it to be a rocky area with small to mid size boulders lying around. It occurs near the rise, so it might have been created by a cliff which crumbled years ago. The procedure is easy. Choose two ground colours. Say brown and black. Airbrush [?] (In the example I used soft round 13 pixels) the general area using the first colour. Then mark a few black dots using paint brush [?] (hard round 3 pixels) to represent boulders. Our scree is ready.
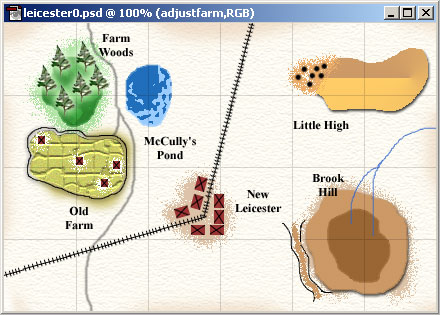
Naming the Features
Select the text tool [?] , click on the map, type in the desired names, use the move tool [?] to move the labels around. I prefer Times New Roman, Bold, 12 points(pt), crisp for labeling. I prefer to use black colour for labeling terrain. Other dark colours (say Red and Blue) can be used to label troops.
Choosing and Adding the Ground Layer
We have added all the required features. It is now time to set the tone of the ground where all these features are placed and make some final adjustments. Go to the lower most layer in your layers panel and select the Background layer [?] . Create a new layer. The idea is to create a layer just above [?] Background but below all others. Name this as "terrain".
Now look at the map closely for a few moments and try to visualize a suitable common ground colour for all the features. I chose a shade of sandstone (#FDFAF1). Select and fill the entire terrain layer with this colour. Proceed to add some noise using Filter > Noise > Add Noise with Amount and Distribution 2 and Uniform respectively. You can then try Filter > Texture > Texturizer. Choose Texture, Scaling, Relief, Light Direction as Sandstone, 2 and Top. Tick Invert at the bottom left. Here is a snapshot of the texturizer.
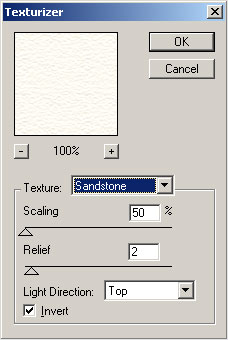
Create another layer named "adjust" immediately above [?] the terrain layer. In the adjust layer, we will provide airbrush coatings specific to various terrain features. Say for instance a light green coating around the base of the forest and light brown around the village. The example was done using Airbrush set to brush Soft round 27 Pixels, mode dissolve and pressure 100% for all except the farm. For the farm I set the mode to Normal.
Note: As an afterthought I decided to add a few small houses to the farm. Before you do this however, make sure that it does not change the map or "history" drastically. The last thing you want is to have the players and/or the game master shout at you on seeing the map!
As the final touch, I created a new layer, coated the edges and corners of the map with a slightly dark colour and set the layer opacity [?] to 50%. This gives the map an "old" look :)
Adding Troops
As part of this section we'll take a look at the following.
- Mounted Troops
- Foot Troops
- Artillery
- Making the troops "stand out"
- Placing Generals, Leaders and Champions
- Routing troops and wedge formations
- Marking Combat
- Placing camps
For our purpose troops can be divided into three broad categories - Mounted, Foot and Artillery. To keep things uncomplicated let us not distinguish between various sub categories of these. I generally use the Red Force (#FF0000) - Blue Force (#0000FF) colour convention to distinguish between troops belonging to the two sides. If there are more than two sides involved or if you want to distinguish between the various units - "Hussars in dark yellow, musketeers in brown" - try using other dark colours which stand out against your ground layer.
Mounted Troops

Start with any one of the two sides. Set the foreground colour [?] as Red, Blue or whatever you have chosen. Set the background colour [?] to white. We will start with mounted troops.
- Create a new layer [?] , and name it as "cavalry".
- Select the layer, mark a small rectangle shaped area [?] . Keep the size of the rectangle in proportion to your actual unit size on the table.
- Fill it [?] with the foreground colour.
- Let the area remain selected. Switch colours (foreground is now white) and get the line tool ready [?] .
- Click on a point just outside the top right corner of the rectangle and drag the tool diagonally to a point just outside the bottom left corner. Let go of the line tool.
- You should now have a red rectangle with a white line drawn diagonally across it. Switch to the paint bucket tool [?] and fill the diagonal bottom half of the rectangle with white colour.
- Select marquee [?] and click outside the rectangle. A cavalry unit is ready.
- Copy and paste this to get as many cavalry units as you need. If your units differ in size, repeat steps 1 through 7 again with a suitably sized rectangle.
Remember to keep the frontage of all the units constant. You can increase the depth of the fill rectangles for bigger units like Elephants or Camelry.
Foot Troops

Foot troops are much easier to create. Create a new layer called "infantry", and repeat steps 2 and 3 mentioned above for cavalry. Our idea is to create solid filled rectangles with uniform frontage and varying depth. For example pike blocks have to be deeper than skirmishers.

In some cases you might want to depict special formations like tercios. Look up the basic shape of the formation. A tercio looks like a rectangle with small rectangles attached at the corners. Create and fill the big rectangle first. Create one of the small corner rectangles in a new layer. Copy and paste thrice. Move each of them around to align precisely. Merge all of them down to the big rectangle to form a Tercio. Check the illustration to see a completed Tercio.
Artillery

Artillery is created using a process similar to the one for cavalry. The key difference is that we will mark two diagonal lines cutting the rectangle into four. We can just replace step 5 from the list above with the two steps shown below.
- Click on a point just outside the top right corner of the rectangle and drag the tool diagonally to a point just outside the bottom left corner.
- Click on a point just outside the top left corner of the rectangle and drag the tool diagonally to a point just outside the bottom right corner. Let go of the line tool.
If things go well we have a double partitioned rectangle. Switch to paint bucket [?] and fill the left and right triangles in the partition. The illustration shows an artillery unit.
Making the Troops Stand Out

We are not done yet. The troops need to be visible clearly against the terrain. To achieve this we will once again seek the help of shadows. Select each of your troop layers and apply Layer > Layer Style > Drop Shadow. Set the blend mode to multiply, angle to 120, opacity to 75%, tick global light, distance as 3, spread as 0 and size as 3. Click OK. The illustration on the right shows the troops after shadows have been applied.
When your troops are placed over relatively darker terrain features you should consider adding the Layer > Layer Style > Outer Glow effect. This can also be applied to text labels for similar purposes.
Generals, Leaders and Champions
Generals, Leaders and Champions Leaders are marked using smaller sized units of the same type as theirs, with an extra "flag" marker thrown in. In other words, cavalry generals would be marked by drawing a small cavalry unit with a flag, foot generals by drawing a small foot unit with flag and so on. In case the generals are not stand alone but attached to any particular unit, just attach the "flag" to that unit.

A convenient way to create a flag is to use the text tool [?] with the Wingdings font. Choose the text tool, set font to wingdings and size to 20 points. Click anywhere on the image and type P (upper case) to get a "flag" marker. Select marquee tool to deselect the text tool. Right click on the "T" layer in the layers panel. Choose Rasterize Layer. This should convert the text layer to an image layer. Fill the two enclosed areas in the flag using paint bucket. A flag marker is ready. To create the illustration on the left, I created a flag marker, moved it over the cavalry unit, made sure that my flag layer was above the cavalry layer and merged down.
Routing Troops and Wedge Formations

Routing or shaken troops can be marked using a few filled boxes. Use marquee tool to select and paint bucket to fill a small rectangle. Copy and paste in a random bunch. Merge all down to get a single "rout" layer. With the shadow added, a bunch of routers should look something like the image shown on right.
Formations which differ from the norm include columns and wedges. I used to come across wedges chiefly in games which involved medieval knights. We'll represent a wedge using a triangle. To draw a triangle we will use the Polygonal Lasso [?] . Select the lasso. Click on any point; this will be the first corner of the triangle we are trying to select. Move the tool and click the next point which will be the second corner. Similarly select the third corner. Finally click again on the first corner to select the triangle. Switch to paint bucket and fill the triangle. Let the triangle remain selected for the time being.

A triangle can point in any of three directions. To distinguish the actual facing, we will add a small black tip to the "facing" corners. Bring black to the foreground and use the line tool to draw a small line at a short distance from any corner connecting any two sides of the triangle. In the "small" triangle which is thus marked, fill black. Whew! We have a wedge!
To indicate that the wedge is pointing in any direction rotate the wedge [?] such that the black tip is pointing in that direction.
Note: If facing is equally important for all your units, you could follow the same convention. Except that you will be drawing black lines to indicate the edge of the rectangle rather than the tip as in the case of wedge triangles.
Marking Combat

One of the easiest ways to mark combat between red and blue troops is to display a glowing "x" symbol over them after placing them together. To do this we need the text tool [?] . If you have the font wingdings 2 use it. If not Times New Roman will do nicely. In the former case click the tool on the image and type an upper case "O". In the latter case type a lower case "x". Right click on the text layer in the layers panel, Rasterize it and use Layer > Layer Style > Outer Glow to make the "x" stand out. In this case the outer glow was created using blend mode, Opacity, noise, colour, technique, spread and size set to Screen, 95%, 0, white, softer, 32%, and 5 px respectively.
The picture to the right shows a wedge of knights crashing into a unit of foot soldiers. The colour of the "x" is by convention the colour of the side which initiated combat.
Note: 'Glowing' text messages can be used as an alternate way to indicate routs or combat. Such a decision is left to the the reader.
Placing Camps

How important are camps to your game? Camps have to be marked prominently if they played a part in the game. Otherwise, you might want to skip them. We will assume the former and see how to do it. Create a new layer, name it as "camp". Select a rectangular area [?] of proportionate size and fill it [?] with the side's colour. Now deselect the region and select a smaller rectangular area within the filled region. Once you have selected it press delete. We now have a rectangular "box". Use the magic wand tool [?] and click anywhere inside the box. Fill it [?] with a shade of sand, say #E8E4C6. Without deselecting, apply Filter > Texture > Patchwork. Use the settings Square size 2, Relief 0 and click OK.
Switch colours to black. Get paintbrush [?] tool ready and set its brush to Hard Round 5 pixels. Mark black dots at the four corners of the box. Use Layer > Layer Style > Drop Shadow and Layer > Layer Style > Outer Glow. A down to earth, very romanesque camp is ready.
Saving the Image
We will save separate images depicting the various stages of the battle. At this point, you would have the terrian map, or leicester0 ready. The 0 by convention means just the terrain. Subsequent images depicting deployment and further stages in the battle can be named as leicester1, leicester2 etc. To save the psd or Photoshop Document - with the layers and all - use File > Save or Cntrl + S. We will also need a copy for the web. I use JPG format for all the images. To do this in version 6.0 choose File > Save For Web or Alt + Shift + Cntrl + S. If you are saving your image for a web page make sure that the size of the image stays reasonable. There are four options when saving as JPG namely Maximum, High, Medium and Low. In my experience choosing High gives a good balance of quality and size.
After creating the jpg and the psd, it is time for us to move forward and mark the intial deployment. Use File > Save As or Cntrl + Shift + S to save the image as leicester1.psd. In the next section of the tutorial we will be working on this image. After adding the deployment etc., we will save a jpg copy of the image, and then save it again under another name as say leicester2.psd for further work.
On to Part 3
Part 2 of this tutorial ends here. You can jump back to Part 1 or move forward to Part 3.