Disclaimer: The author would like to make it clear that he is not a Photoshop Guru. He is just a novice who juggles less than 5% of this excellent tool to create maps for this web site. All readers are hereby advised that this tutorial is by no means professional advice on map making or Photoshop.
Conventions: All menu options are denoted using the > symbol. For instance, Choosing the "File" menu followed by "New" would be denoted as File > New. Similarly all key presses are denoted by +. For instance, pressing Control, shift and N keys together would be Cntrl + Shift + N. The [?] symbol will be displayed with most instructions. Clicking on it will take you back to the section which briefly describes the action or tool.
Troop Movement
This article starts from where Part 2 of this tutorial left off. You can read Part 3 below or go back to Part 1.
All though the other two sections of the tutorial cover some important ground this section deals with the actual conversion of the various sketches to maps. Our battle takes place in New Leicester, South Africa which is a small frontier town contested by the English and the French colonials. We already have the terrain marked out, let us now refer to the sketch of initial troop deployments.
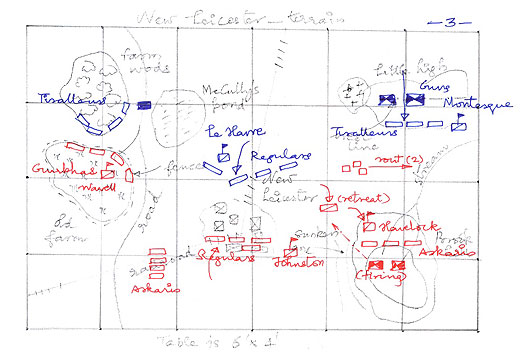
Deployment Map
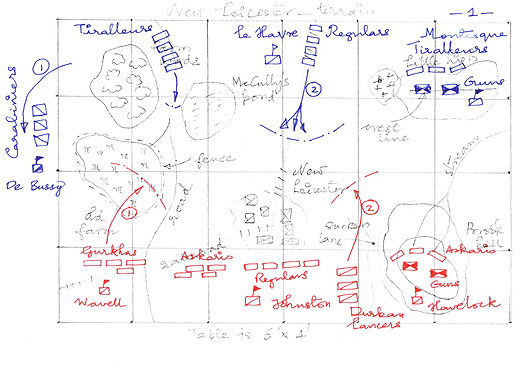
On the English left are elements from the 2nd Gurkhas lead by Colonel Wavell. Wavell was in India before where he formed his high opinion of the Gurkhas - so much so that he has included no other troops in his command. To his right in the British centre is Brigadier Johnston, mission commander. Johnston commands a mixed force of Askaris and British regulars. Commanding the guns on Brook Hill and the Durban lancers on the plains below is Brigadier Havelock. Havelock is senior to Johnston but had to be satisfied with cavalry and guns for this mission. He is indignant and intends to avenge the insult by scoring a point or two in his favour during the battle.
The French are concentrated in two columns of Tiralleurs and Regulars lead by General Le Havre. A few Tiralleurs under Major Montesque are waiting behind the guns on Little High as part of what seems to be a bait for any adventurous British cavalry. Unknown to the British a column of veteran carabinieri under Colonel De Bussy (no relation of the musician) is marching marching unseen along the west flank.
Note: If there is anything about creating units and marking them that you do not follow in the following explanation please refer to the section on adding troops given in Part 2 of this tutorial.
We will be working on leicester1.psd to mark the initial troop deployment. If you are not sure check out the section on saving images again.
Let us start by creating the different troops. I recommend creating separate layers [?] for each command. You can also segregate the artillery of each side in separate layers. Since the guns didn't move during the battle we can leave these layers undisturbed as we progress. This would prevent cluttering the layers panel and yet give enough flexibility. In many cases you will be moving the command as a whole. However when you do have to move individual units first select the unit from the layer using the marquee tool [?] . Cut the unit using Edit > Cut or Cntrl + X. Paste (Edit > Paste or Cntrl + V) the unit in a new layer. Move it around [?] and/or rotate it [?] as necessary. Finally merge down with the original "command" layer.

If you notice, arrows have been marked in the sketch showing the initial movement of the Gurkhas, Durban Lancers, Tiralleurs and French Regulars. Reproducing them on the map would be a good idea. Adding them has the interesting side effect of making the map appear a bit more "dynamic". Start by creating a new layer [?] titled "arrows". Move the layer [?] all the way up in the layers panel to just before the grid layer. The arrows will be drawn in the same colour as the troops, so set the foreground accordingly [?] .
Select the line tool [?] . In its properties, click on the button with an arrowhead pointing down. A small menu titled "Arrowheads" will drop down. Tick the box labeled "End". By doing so we are specifying that the arrow head should appear at the end point when we drag the line tool from one point to the other. On the arrows layer click the line tool on a point just above the Gurkhas and drag to a point just inside the farm. Release, and an arrow should be ready.
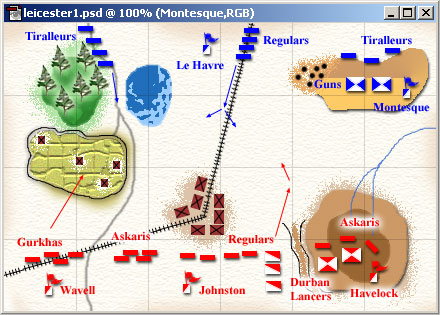
As a final touch, make all the terrain labels invisible. The terrain has been taken over by troops, and henceforth we will label only the troops. This also keeps the map uncluttered. If everything goes according to plan a map like the one shown on the left should be ready.
Adding the Flank March
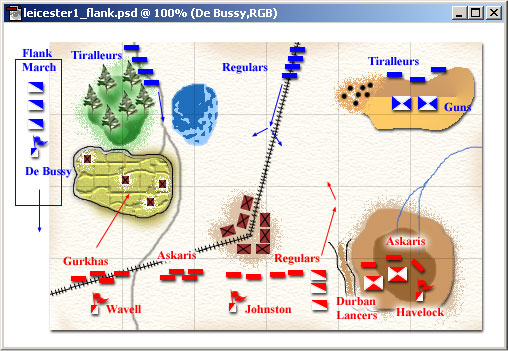
Our deployment map cannot be considered complete without showing the flank march. We will mark the flank march outside the main image. To do this create a new image [?] named leicester1_flank.psd. Make sure that leicester1_flank is bigger in size to accommodate the flank march which we are going to mark partly outside the main map. In this case I have chosen width and height as 500 and 324 pixels respectively. Once the image is ready follow the below given steps in sequence:
- Make sure that you have two images open in Photoshop, namely leicester1.psd and leicester1_flank.psd.
- Select leicester1.psd.
- Choose Layer > Flatten Image.
- All your layers will be merged down and you get a single Background layer.
- Click and drag this layer to leicester1_flank.psd.
- Once the layer appears in leicester1_flank.psd, go back to leicester1.psd and choose Edit > Undo Flatten Image or press Cntrl + Z. All the layers should now come back. Promptly save the image File > Save or Cntrl + S.
- Switch attention to leicester1_flank.psd. Move the layer copied from the other image around until it is roughly in the centre.
- Draw a "box" by selecting a rectangle [?] , filling it [?] , selecting another rectangle inside it and deleting (Edit > Clear or press Delete).
- Inside the box, draw all the troops who are flank marching.
- Apply shadow through Layer > Style > Drop Shadow for both the map and the flank Marchers.
- Did you get an image like the one shown on the right?
First Combat
Lead by a determined Wavell, the Gurkhas made some early advances. They reached the farm in no time and were soon spreading out and searching the farm for enemy troops or sympathisers. Seeing the Gurkhas enter the farm forced the Tiralleurs opposing them to have second thoughts. They halted at the fork in the road which lead to the farm and decided to wait for a while to see if De Bussy and his men would make it in time. Besides their commander Le Havre was too busy directing the French regulars to issue them any direct orders.
In the French centre Le Havre drove his men on hard in an urge to cross the open ground and gain New Leicester before the English.
Havelock was the first to react to the French aggression. He drove the Durban Lancers - lightly armed cavalry - to meet the threat. His animosity towards Johnston seemed to have affected Havelock's judgement so much as to send out the light cavalry against well armed French infantry.
Brigadier Johnston was shocked by the reckless advance of the Durban lancers. He moved forward to check their advance but he was too far away. The English regulars and Askaris, deprived of orders from Johnston slowed down. The Regulars continued on for some time under prodding from Major Hayward who took charge, but they too soon stopped after entering the southern most edge of New Leicester.
The Durban Lancers quickly reached medium range for their weapons. Urged on by the enthusiastic Havelock they opened fire at the french regulars immediately. The firing came as a surprise to the Frenchmen. The 4th Lyon Scouts retreated in confusion after taking some minor loses, but the others held their ground. And seconds later the Frenchmen replied with their own volley.

The effect of the infantry volley was devastating. Two of the three units from the Durban Lancers immediately routed and fled. Havelock himself was forced to gallop back to the cover of brook hill. One of the units escaped serious mauling but retreated nevertheless.
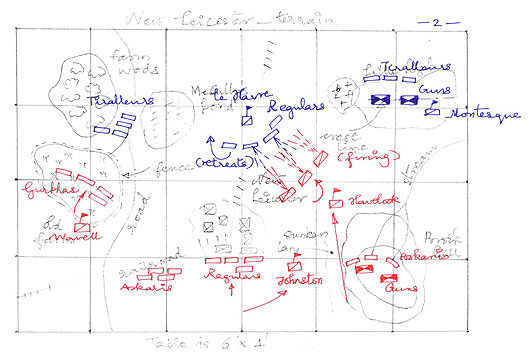
Start by saving (File > Save As) the earlier image leicester1.psd under a new name, say leicester2.psd. You can now move the various troops around to the appropriate positions. Start from troops of any one side and any one edge and work to the other edge and side. Don't forget to erase all the arrows in the arrows layer and draw new ones.
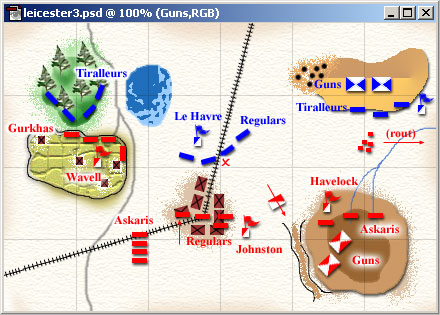
When translated to a map, the sketch looks like the image shown on the left. Notice the six combat "x"s, glowing. They have been used here to mark incoming gun fire. Also note how the words Gurkhas, Havelock and Tiralleurs have been highlighted as they have now been placed atop dark terrain.
Routs, Advances and More Firing
The Gurkhas faced off against the Tiralleurs who had by now entered the woods and were taking cover just behind its edge. Wavell decided to wait for word from Johnston before he went any further. His initial orders had been to seize the farm and hold and he had executed it perfectly. The Gurkhas took positions on the farm's perimeter, taking cover behind the fence.
The Askaris in the British left finally got orders to form up in column, and they did so with a bored look on their faces. In the right flank the Durban Lancers were routing in spite of Havelock's best efforts to rally them. Enraged by the sight of the routing cavalry the British Guns opened fire on the French regulars. It checked their advance for a while as the french lead unit hit the ground and assessed the threat. However the range was too great for the light guns to do any serious damage. All the while the English Regulars made heavy progress in the alleys of New Leicester.
As an emergency measure Havelock ordered the Askaris guarding the guns forward.
In the French left Major Montesque decided that the English would never take the bait and advanced with his Tiralleurs. They descended from Little high and marched on to the plains.
As before, start by saving (File > Save As) the earlier image leicester2.psd under a new name, leicester3.psd. You can now move the various troops around to the appropriate positions. Start from troops of any one side and any one edge and work to the other edge and side. Don't forget to erase all the arrows in the arrows layer and draw new ones. The firing indicator "x" shown denotes the British Artillery fire. Montesque's label has been removed from this map as it could not be fitted in without appearing cramped. Also note the usage of rout markers. Refer to this section to learn how to make them.
Flank march arrives, More firing and a Melee
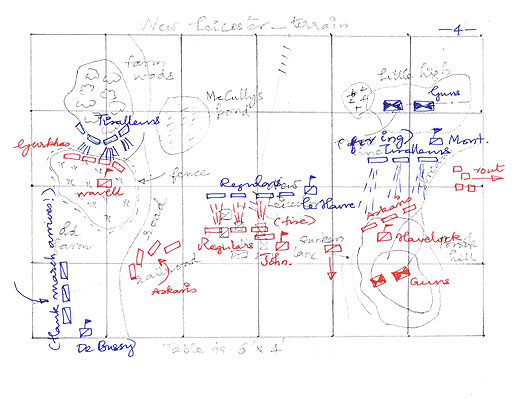
The battle took a decisive turn when De Bussy finally arrived at the head of the French cavalry. Several things happened in quick succession after that.
The Askaris on the British left frantically wheeled to face the new threat. Encouraged by the sight of De Bussy and his men, the French Tiralleurs sent an accurate volley on its way towards the Gurkhas and pinned them. The English Regulars, having finally navigated the roads of New Leicester and made it across to the Northern edge of the town almost ran into the French regulars. The English opened fire immediately. Lead by Montesque the French on the French left opened fire on Havelock and his Askaris who were just descending from Brook Hill on the British right.
De Bussy's men managed to rout two of the Askari units, but the other two managed to hold and returned fire with good effect. The French right, encouraged by the sight of the pinned Gurkhas, charged them. A mistake. Anyone who knew the Gurkhas would prefer dealing with them from a distance than at close quarters.
 The Tiralleurs tasted the steel of the Gurkhas' Khukri, a sharp wickedly curving knife which came out of its sheath during close combat. In the hands of the trained Gurkhas the Khukri proved to be far more deadly than the Tiralleurs bayonets. With cries of "Ayo Gurkhali", or "Here comes the Gurkhas" Wavell's men entered the melee and made life very difficult for the Tiralleurs.
The french centre tried their best to return fire and take cover at the same time, but the British fire was overwhelming and the Le Havre's men soon broke ranks and headed for home under the terrible hail of bullets.
The British right fared poorly. They came under fire from Montesque's men as soon they reached the level ground. some of them retreated, but most routed right in front of a white faced Havelock desperately trying to stop the men.
As it turned out, De Bussy's men fell back, the English left and centre held. the French were in a relatively strong position on their left but did not have the numbers to press their advantage. Moreover, the centre was fast clearing of French regulars, leaving Montesque vulnerable to flanking. Realising the hopelessness of his position, Le Havre decided to call it a day and ordered retreat.
The British had won the battle for New Leicester.
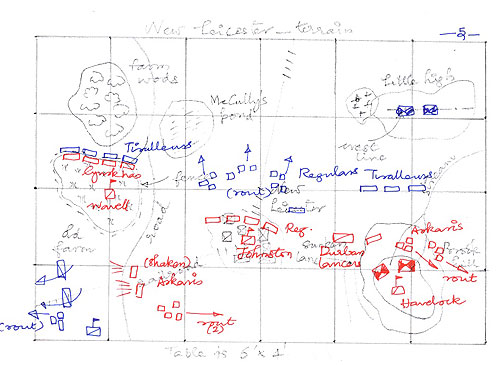
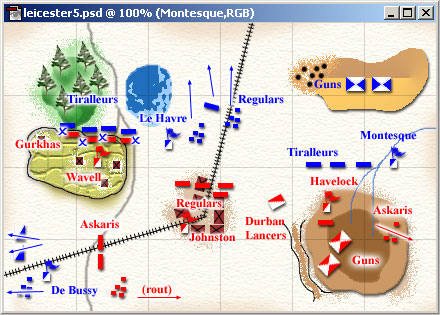
Save (File > Save As) the earlier image leicester3.psd under a new name, leicester4.psd. After you are done with leicester4.psd you can add the final map, leicester5.psd. The image on the left shows leicester5.psd depicting the last stage of the battle. There are quite a few rout markers visible on the map. Refer to this section to learn how to make them.
Miscellaneous Features
There are a few things which I consider to be chrome plating to the basic map. these include Navigational aids and various national insignia.
The simplest navigation aid consists of just an arrow tipped line drawn with the arrow pointing North, and the letter "N" in bold. By conventions North is always up and South always down.

A more fancy way to make a compass is to use one of the more exotic fonts again. Choose the Text Tool [?] and set the font to wingdings. Let the font size be around 30-40 pt depending on the size of the map. Black is the best colour to use. Type the character ] (Right Square Bracket) on the keyboard to get a symbol which resembles a ship's wheel. Change font to Times New Roman and type the character N (upper case) just above the top most tip of the wheel. Right click on each layer in turn and Rasterize them. Merge down to get a single compass layer.
National insignia are best collected from third party bit maps, unless it is something simple to reproduce like the French tricolour. For this map I have used the Union Jack for the British and the Fleur De lis placed over the tricolour for the French. Both were copied from third party images.
Note: Save your psd images for future use. I have found this to be very useful as old images can serve as templates and prevent recreating common features such as grids and some troop types.
Your Feedback
We have come to the end of the map making tutorial. I am very keen to know how you liked this tutorial. Did you find this tutorial useful? What are the areas that could be improved? Do you require any additional information on any related topic which is not covered under this tutorial? Just drop a line to our club mailbox indiawargamers@yahoo.com.
This tutorial ends here. You can review Part 1 or to Part 2.